Do I have to repot? Really? But I don’t want to? Why?

That is usually the first question I get asked when people see the options available for repotting orchids. And my answer is: Yes. Yes, really. I’m sorry but it is necessary. Yes you have to. Do you want your orchids to survive?

It always next moves to the question on why there are so many choices.  My simple answer is why are there so many different food choices?  We have our favourites, and orchids have their favourites too.

Orchids grow naturally in trees, on rocks, in sand, in jungles on the forest floor and even in the Artic.  In fact, orchids grow everywhere, other than in the Antarctic.  So now you get the picture – orchids grow everywhere, and everywhere is not always the same.   It can be hot, dry, cold, wet, humid, windy, sheltered, frosty – in essence, everything that your windowsill isn’t.

When we pot up orchids, we are actually trying to mimic the natural habitat of orchids in a pot.  It is not always easy as you can imagine.  The options are there to adjust the conditions in the pot so that they are closer to natural surroundings.  This is critically important for species (plants as they are found in nature), but hybrids (man made crosses not found in nature) are generally more forgiving.

There are many options available, from sphagnum moss (from either Chile or New Zealand), fir bark, coconut husk (coir), tree fern, cork bark, charcoal, perlite and sponge rock, humus, vermiculite, hydroponic media and countless others up to chopped automotive tires.  As you can imagine, each one has its on benefits and drawbacks.

Typically, most orchids at home are in one of two options – sphagnum moss and fir bark mixes.  The moss will hold the most water, while large chunk bark mixes will hold the least (that is if we exclude chopped tires!)  As you can image, the growing conditions in Thailand are very different from the windowsill over your kitchen sink in Scarborough.  We won’t worry about what might work in Thailand, but just what works here.  No matter what you choose, or what the grower you bought your plant from chose, you will have to replace it, usually within two years.  Whatever you pot in the pot to mimic the natural conditions, will rot in the pot over time:  you do not have the luxury of having nature replace everything automatically for you.

After having the conversation about why you need to repot, it is my turn to start asking questions – what kind of orchid is it, how big is it, what is it in now?  This is where you need to be able to tell me what you have, because all orchids are not equal when it comes to what is in the pot.  You really need to know the name of the plant if you are going to ask for help with it.

Your common choices are Phalaenopsis, Cattleya, Oncidium, Paphiopedilum.  The potting techniques are  almost the same, but you use different potting media for different plants.

Before you start to repot, you need to put your kit together.  You will need your orchid, which has been well watered, newspaper, the new media you will be using, a fresh pot, a sterile blade and a pencil.  You will need a pot as well (duh!!) how big you ask?  Well it is big enough for the roots you have; typically you use the same size pot on a mature plant or one size up for a plant that is growing in size or that you want to maintain as a large specimen.

Now lets repot!!

Phalaenopsis

Lets start with the most common, the Phalaenopsis, or sometimes called Doritenopsis.  They are also called the Moth Orchid by some.  You can treat small Phalaenopsis and Cattleyas the same way, and large Cattleyas and Phalaenopsis similarly as well; they just prefer different stuff in the pot depending on how big they are.

You need to water your orchid well; this will allow the old mix to be more readily removed.

We need to determine what you have chosen to use to repot your orchid with.  If the plant is in a pot 6” or larger you will want to use a bark based mix with larger chunks.  I use one which is bar, sponge rock and charcoal.  In pots 4” or smaller, I use New Zealand Sphagnum moss.  For 5” pots you can use either, depending on whether or not you have a heavy hand with watering.  The more you water the better bark will work for you.  I have a very light hand with watering, so moss overall works better for me.

Lets first do a small one, so we will be using New Zealand sphagnum.  You need to soak the moss for about 20 minutes, squeeze out the excess water, and then fluff up the moss.  It will then be just damp.

Now that you have made the decision to repot, you have your media and other supplies ready and your plant all watered you are ready to start.

Step one is to spread out the newspaper where you are going to be working.  It will make cleanup easier.

Step two is to remove the plant from the pot, carefully put aside the tag (you will need it later) and start to carefully remove the old media from the roots.  You want to gently do this so as to not damage the roots too badly.  When they are fairly clean, gently rinse them and put the plant aside.  If you have any dead roots (they squish like a wet sponge) you can remove them with a sterile blade to prevent transferring infections.  Good roots are hard and do not squish. Now you can roll up the newspaper and dispose of the old mix into your compost bin or green bin for organics.

Step three is the easy part.  Take a small ball of moss, and place it in your hand.  Put the plant on top of the moss ball allowing the roots to hang down.  Gently wrap the roots around the ball you have made.  Now take more of the moss you have and pack it around the roots covering the root wrapped ball completely Finally take your ball and place it in the new pot so that it is about ½” (1 cm) below the rim of the pot. Add a bit more moss if necessary so the plant does not wobble in the pot.

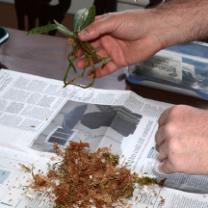
Step four is to take your label, and add to the back-side of it the date.  This will help you keep track of when you repotted, and when you will need to do it next.

AND NOW YOU’RE DONE!  Easy eh!


 Cattleya

Now if you have a larger Phalaenopsis, you can treat it the same as a larger Cattleya and repot with  a bark mix:  just follow the Cattleya directions.

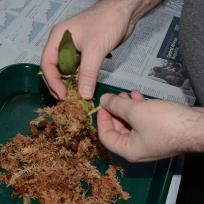
For this bit, we are working with a larger Cattleya or Phalaenopsis; that means in a pot 5” or bigger.  Now for a Cattleya, we also have to question what size the pot is, but for Cattleyas I find that 4” pots and smaller are better with New Zealand sphagnum, and those pots larger need the bark mix.  If you have a small plant, then follow the instructions for Phalaenopsis.    These are for the large plants.

As with the Phalaenopsis, get all of your materials together and water your plant well.  For these larger plants you will be using the bark mix to repot; it is important that you SOAK THE MIX OVERNIGHT prior to using it.  The bark takes much longer to wet properly.  If it is not thoroughly wet, you will end up starving your orchid for water. This step cannot be rushed or overlooked.  If you forget, or do not have enough, do it tomorrow!

Step one is to spread out your newspaper!

For step two, again you 
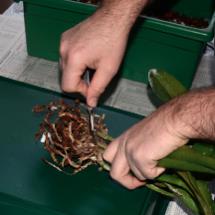
need to remove the plant from the pot as gently as possible.  If you have roots growing through slits in the pot , it is helpful to cut the pot apart to save the roots.  Remember the dead roots are squishy and the good ones are firm.  If you find you need to remove many roots – and remember we all kill roots – do so with a sterile blade; you do not want to transmit disease from one plant to another accidentally.  Be gentle removing particles of the old mixture: remove as much as you can without seriously damaging the remaining roots.  Remember, we grow roots with a plant attached; without roots there will be no flowers! There is another half step when repotting a Cattleya which is not involved with Phalaenopsis.  Cattleyas are sympodial orchids, that is they grow by marching ACROSS the pot, not constantly upwards as Phalaenopsis do.  This means that as the Cattleya matures, the older growths (pseudobulbs) will loose leaves, yellow and dry off.  When this happens, we do not want them in the new pot.  These old back growths can be removed with a sterile blade, and you can dust the cut with powdered cinnamon.  If you are dividing up a big Cattleya(putting several pieces into separate pots), make sure you leave at least 4 or 5 growths together for each pot:  too few and the plant will take a long time to recover and start flowering again.  As with the Phalaenopsis, now roll up the newspaper and toss out all the old mix, rotted roots and any removed growths..

 Step three is a little different when you are using a bark mix. At this point, I typically get out a tray; the mix will drip water all over and slowly drain out of the pot.  If you don’t mind constantly washing your counters then you can skip the tray.  To start with, place some of the mix into the bottom of the pot.

For a large Phalaenopsis, put the plant into the pot and hold it so that the lowest leaves are about ½” below the edge of the pot:  I find it helps at times to rotate the pot so that the roots spiral allowing you to get the plant to the right level.  Now take one handful of mix at a time and put it in the pot over the roots and wiggle the pot to settle it in.  Slowly work you way around the pot, handful by handful until it is full.  Push down firmly to compact it all in so the plant does not move.

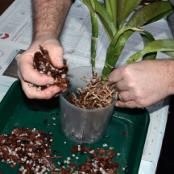
For a larger Cattleya, we again start with some mix in the bottom of the pot.  Again, place the plant in the pot, and twist if necessary to get all the LIVING roots inside.  Now the tricky part; you need to place the oldest growth up against the side of the pot.  Cattleyas grow across the pot, so we want to provide the most room possible.  Holding this old growth to the side, and at a level so that the rhizome (the horizontal bit between the growths) is about ½” below the rim, start adding handfuls of mix and jiggling the pot to settle it in.  Firmly press it down to hold everything in place when the pot is full.

 Step four adds an extra bit:  water the pot well, and you will flush out the dusty particles which are inevitable in a mix.  Add the date you repotted to the back of the label and return it to the pot.

And now you have done a Cattleya!!


Leave a Reply

Spiranthes romanzoffiana Cham

Spiranthes romanzoffiana Cham Spiranthes are a group of orchids which are pan-global (around the world) in their distribution, and are commonly referred to as Ladies’ Tresses. The different plants and flowers (different species) are very similar in each , and it can be difficult to tell them apart without taking a very close look at the flowers, or even taking them apart. Most of the plants have white flowers, sometimes with a bit of green, sometimes yellow, but there are a few exceptions with red flowers. Regardless of species, they all have small flowers arranged in a spiral which twists its way along the length of the inflorescence (flower spike). This twist is what ‘Spiranthes’ refers to.

In Canada we can easily find Spiranthes romanzoffiana in many locations, and it is the only species to be found in Newfoundland making identification there very easy!! The actual range for this species includes every province and territory in Canada, Alaska, south to California, eastern Siberia, and even Ireland and islands in the Hebrides. It was originallyinally described while Alaska was still under the control of Tsarist Russia, and was named for Count Nicolas Romanzoff (1754-1826), a Russian Minister of State, by Adalbert von Chamisso.

Locally known as Hooded Ladies’ Tresses from the shape of the flower,  the inflorescence is composed of 3 or 4 vertical columns of flowers that twist around the stem.  This stem can be short in very harsh conditions to a height of over 20cm where growth is more favourable.  If you look closely at the lip of the flower, you can see that it is violin shaped, helping the identification.  When you are that close you may be able to smell the light almond fragrance as well.  Unfortunately where we were it was too windy to be able to smell much beyond the damp earth.

APhotographing Spiranthes romanzoffianat first glance it seems that it should be easy to find, especially since many of the books describe it as wide ranging.  It is important to understand that wide ranging and being easy to find are very different.  Many times we found lots of the plants in certain areas (locally abundant), and then there would be nothing if we went 20m or so away.  Spiranthes romanzoffiana and lighthouse As it turns out, Spiranthes romanzoffiana is specific in its requirements making it turn up in surprisingly narrow areas.  It will grow in meadows and clearing in the woods, as well as in roadside gravel and right along the coast.  It is usually in bright sun, sometimes in a grassy meadow, but not often in shady areas.  Most important, however, are areas where the water seeps just below the surface. At times, the water will form a film over the gravel layer, and you can see the sheen in the sun.  In these very tough areas of gravel and bright sun, the plants tend to be stunted. Measuring Spiranthes romanzoffiana

All places where we found this remarkable plant were locally wet, boggy or had water seeping through the ground.  This is very important if you want to grow Spiranthes at home in the garden.  They require a very moist mixture, but also one that is very coarse, similar to many rock garden plants.  The one which you see here ( a related species, Spiranthes cernua) is planted in a very gritty mix, and watered every 3 days in the house.  Normally we would see it going into dormancy now, but it has decided to start growing new rosettes so I will keep watering it and giving it bright light.  These plants are available from a few nurseries, but please check that they are propagated plants.  PLEASE DO NOT REMOVE THEM FROM THE WILD AND PLEASE DO NOT BUY COLLECTED PLANTS NO MATTER HOW TEMPTING IT MAY BE.
Habitat of Spiranthes romanzoffiana


– Jay Norris

For further reading:

The Orchids of Bruce and Grey Counties, Ontario
The Canadian Field Naturalist, Vol III No 1, Jan-Mar 1997
Scott, P.J, and Black,D; Wildflowers of Newfoundland and Labrador, 2006
Munden, Carl; Native Orchids of Nova Scotia A Field Guide; 2001
Ames Acheson et al; Orchids of Manitoba, 2005
Williams John G.; Field Guide to Orchids of North America, 1983
Brown, Paul M; Ladies’ Tresses in your Pocket, 2008
Brown, Paul M.; Wild Orchids of the Northeastern United States A Field Guide, 1997
Brown, Paul M.; Wild Orchids of the Canadian MAritimes and Northern Great Lakes Region, 2006

One Response to Spiranthes romanzoffiana Cham

  1. Hi Jay,
    We have been studying Spiranthes romanzoffiana in north west Ireland for the last 9 years or so , and we are very interested in your comment that they occur in Siberia. Would you have any references to this? We have not seen any information on their occurrence there but it would seem to be understandable that they might disperse across from the islands near Alaska…
    We studied Spiranthes over a period of 8 years on Lough Allen, Co. Leitrim (http://loughallenbasin.com/spiranthes.html) and now are studying wildlife in the west of Ireland. This is a personal website, based on our hobby/obsession of photography and wildlife! It would be great to hear from someone like you (or anyone else) who knows ‘our’ Irish Lady’s Tresses (as they call them here) in another continent. Love to hear from you!
    Regards, Frances Farrell

Leave a Reply

Harvesting Rain Water in Tanks

Water is the most essential need of all living beings. Because of its importance people have been trying to save water for their household, business and agriculture purposes over the years. Rainwater harvesting in water tanks has taken dimensions that have gone beyond anyone’s imagination because of its economical, water saving and environment friendly qualities. The importance of installing rainwater tanks is high for residents of the properties in Melbourne, because government restrictions are made on water. Because of these restrictions, there are rebates available for the purchase of tanks and tanks come in all shapes, sizes and volumes. With the availability of water tanks, people are able to rely on them for all purposes including gardening, swimming pools, washing, domestic uses etc. Because of the increasing importance of water tanks, companies have come forward with innovative solutions to improve their product to suit everyone.

The tanks come in various compact designs to suit even the inner houses of the city. Where rain water harvesting is a must and space constrictions prevent from setting up a big water tank, you can go for a tank that is specially suited to fit small spaces. Oval water tanks, rectangular tanks and other configurations have evolved to suit the needs of the person having very little space to install a bigger one.

Choosing rain water tanks Melbourne is very simple. There are thousands of tanks available in the market and the one you chose depends on the type of tank system you need. Before setting out to buy a water tank, decide on what features you want in your tank and how much water you and the members in your family are going to utilize. The type of tank you should buy also depends on the number of people in your household, the nature of rain in your area, the total area of roof draining into your tank, whether you need to get a pump and whether you need to purify the water for drinking purposes. Above all, see if there are any harmful materials on the roof which will mix with the water and make it poisonous. Once you take these factors into consideration and consider the size of your property, decide on the water tank.

The main types of water tanks available are Concrete Water Tanks (strong enough for underground installation), Poly Water Tank, (cheapest of all), Fiber Glass Water Tanks (durable and corrosion resistant), Modular Water Tanks (can be configured to any size block), Metal Water Tanks (made with corrosion resistant features), Underground Water Tanks (space saving and ideal for small homes) and Bladder Water Tanks (also built underground and below the deck). The brochures on these water tanks are available online. Go through each of these and take into account the above mentioned factors and pick the one you need.

There are water tanks of various price ranges available in the market. If you are planning to buy a rain water tank online, you just have to fill out a form mentioning the shape, volume, diameter, height and length of the one you have in mind. You can also choose your own category. From these specifications you can zero in on the one needed, select and buy.

Solar Flow specialises in solar hot water and rain water tanks Melbourne. Solar flow not only install rainwater tanks and solar hot water systems, they also provide consultation to ensure that you purchase the correct rain water tank or solar hot water system to meet your needs.

Leave a Reply

Rare Orchids – An Overview

Rare Orchids – An Overview

Author: Mel Beauchamp

Orchids are one of the most ancient plants still in existence. Their life began in primordial times, with the species being highly adaptable so that the orchid could grow and change as the Earth itself did. Rare orchids are being protected as different eco-systems collapse.

With their ingrown sense of survival, the orchid lives in every climate, excluding solid ice. They do not necessarily need soil, as they can grow symbiotically in nature. Orchids will live in trees, mountains, bogs, grasslands, rocks, and forests. The roots of orchids will grow in the air, as well as laterally. Today there are over 35,000 orchid species living in every corner of the world. If the orchid doesn’t have what it needs, the plant is clever enough to make the world around it create certain living conditions. Ants have been coerced into living with the orchid so that the acidic content can be put to use within the plant. Since orchids have existed before the birds and the bees, they have found a way to mimic pollinators to trick them into propagating.

Sometimes living in such harmony can become difficult for rare orchids. Orchids have become rare due to the care they need to thrive subsiding or the care is overdone. Other reasons such as deforestation and/or imminent extinction allow orchids to be added to the rare list.

Following are some examples of rare orchids.

– Ladyslipper orchids grow wild in Britain and have been harvested so much they are now on the verge of extinction.
– Phal Amboinensis flava is an albino orchid discovered thirty years ago in Singapore and whose stems grown indefinitely.
– Maxilliara Mombarchoenis and Epidendrum are found only on the Nicaraguan Mombacho Mountaintops.
– Bulbophyllum Hamelini is suffering from Madagascar’s deforestation.
– Fly Orchids disappear in the Netherlands every time their forests get thick.
– Habenaria Psycodes is located in the South Appalachians and is rarely seen.

More recently in 2007, in an ancient tropical forest in Vietnam’s Green Corridor, a new orchid species was found. The specialty of this species is that they are leafless. Not only that, but they have absolutely no chlorophyll or green pigmentation. The forests of the Annamites breed many other rarities, as well. In 2003, it was reported that in dense evergreen forests of Similipal, Orissa there are housed 93 species of orchids. Among these lives the rare orchid Goodyera Hisipada.

On the other side of the globe, in Washington State, lives the Phantom Orchids. Leafless and completely white, the plant will stay dormant for up to seventeen years after blooming just once. Development and logging is destroying the Phantom Orchid’s habitat and is a protected species in Canada.

More than 3,000 orchid hybrids are created annually. Sizes, shapes, and colors abound in the orchid families. There are certainly enough orchids to thrive on the planet. However, some rare orchid species will continue to dwindle and meet extinction if mankind continues to destroy their habitats. Some rare orchids are dying out not because of man, but due to low propagation. The smaller specie classes will need to grow to continue.

As you can see, the rare orchids are far outweighed by the sheer number of living orchids. Who knows – with the brain that these plants have, maybe the devolution of the rare orchids will stop and arise in evolution as the orchid yet again adapts to its ever-changing world.


Mel Beauchamp is an orchid enthusiast. For more great tips and advice on Rare Orchids,visit Easy Orchid Care Secrets

Article Source: ArticlesBase.comRare Orchids – An Overview

Leave a Reply

Phalaenopsis Orchid Flower

Of the many varieties of orchids, the Phalaenopsis Orchid is one of the most popular. Referred to as the “moth orchid” they are the longest bloomers, with blooms lasting an incredible two to six months before they droop and die. They come in a rainbow of colors. Think they are hard to grow? You might be surprised how easy they are to take care of. Here are some simple steps to get you off on the right foot with this exotic beauty.

Watering is one of the most misunderstood parts of orchid care. You don’t want to water too much or too little, where do you find the middle ground? It’s best to water Phalaenopsis Orchids early in the morning so the roots have all day long to absorb the moisture it needs. You can collect rain water or use distilled water as tap water has harmful chemicals that may cause harm to your orchids. You also want to ensure you never use water that has been treated with water softener as this will also cause your plant harm. Water near the rim and let all the water drain out, don’t let your roots sit in any standing water. If they sit in water, they will develop mold and root rot. You should water every four to seven days. There should be a hole in the bottom of your pot, poke your finger in the hole and feel if the soil is moist. If it is getting dry, you are ready to water.

Feeding your plant is very helpful especially since the types of soil used for orchids don’t contain nutrients your Phalaenopsis Orchid needs. Some plant foods made specifically for orchids can be used each time you water. This is a great way to ensure you have healthy and well cared for orchids.

The best time to re-pot and replace the soil is when the weather begins to warm up in spring or fall. When the temperature is steady it will cause less shock to your Phalaenopsis Orchid. For pots that are five inches or more, a good substrate is medium grade orchid bark. This ensures just the right amount of moisture remaining in your soil to feed the roots. If you are planting in a smaller pot, sphagnum moss is a better choice. It dries more evenly and won’t keep pockets of moisture that will damage your roots.

These key hints will make taking care of your Phalaenopsis Orchid a breeze. This variety of orchid is a sure winner and you will enjoy long lasting blooms for months to come.

– Steve Fortuna

Steve Fortuna is an expert with Orchid Flowers, having been working with them for many years. You can find more information and pictures on phalaenopsis orchids, dendrobium orchids, and more by clicking a link above.

Leave a Reply

Background And History Of Orchids (Orchidaceae Family)

The orchid family is not only the largest but one of the most diverse plant flowering families in the world. The orchid was one of the first plants to evolve on earth, it was around in the time of the dinosaur, over 120 million years ago. Given the length of time they have been around it shouldn’t be surprising that there are over 35,000 species with hundreds of thousands of hybrids.

The most famous orchid in the world is the vanilla orchid (planifolia). Coca Cola is the largest customer of vanilla, they use the seed for flavouring. Madagascar is the world’s largest producer. Orchids are very beautiful plants and that is why so much time and care is put into growing them. Vanilla on the other hand is grown for its commercial value rather than for its appearance but it is labour intensive. The vanilla crop is the main source of income for many independent farmers in less developed countries.

Reproduction

One of the ways in which the orchid is so diverse is its ability to reproduce. Some orchids rely on flying insects, others rely on crawling insects and finally there are orchids that rely on the wind for pollination.

The Bee Orchid attracts bees to its flower by its appearance. It looks like a receptive bee which entices the male bee towards its pollinia. Other orchids have long stems which look as they are butterflies when dancing in the wind.

Some orchids have evolved so that they act as a good platform which attracts a weary insect to land. The nectar brought by the visiting insect brushes with the pollinia. Orchids sometimes have very slippery flowers which often results in the visiting insect falling right into the interior of the flower leaving only one exit point. This escape route forces the welcome intruder into brushing nectar against the pollina.

Darwin

Charles Darwin wrote about orchids when demonstrating his theory of evolution by natural selection. He made a prediction about the pollination method of one particular orchid, the Angreacum sesquipidales. He predicted that given this particular species emitted a strong scent at night and was white, the insect that pollinated it would be a moth. Darwin was proved right and it is in fact a moth that pollinates the Angreacum sesquipidales.

Popularity of Orchids

Orchids have become immensely popular recently but they have been written about and cultivated for a very long time. Orchids were first written about in 700 B.C. by the Chinese and Japanese. They weren’t, however, first cultivated until around 300 years ago when seeds were bought by traders from around the globe. It was only the wealthy that could cultivate them initially but luckily this pleasure is available to many more people these days. Even with our 300 year cultivating experience, many a gardener has been frustrated by the care needed to grow beautiful orchids but this only adds to their popularity.

– Nigel Howell

Nigel owns OrchidCareExpert, a website which contains lots of useful information if you wish to know more about orchid care.

Leave a Reply

Lighting Tips For Orchid Care

There are many would-be orchid growers around who would love to start growing orchids but are put off by their reputation as difficult to care for. Orchids are quite resilient plants but there are a few techniques on orchid care that you can use.

Orchid growers will tell you that one of the best ways to learn is through experience. This can be quite costly though as orchids are quite expensive to buy and you don’t want a simple mistake to cause you to end up throwing your orchid away. Please bear in mind that each species has different requirements and that your environment will play a significant part in how your orchid grows.

Orchids can be kept both indoors and outdoors but you must remember that orchids generally thrive in warm temperatures. Having said that, there are orchids such as Cymbidium which prefer cooler conditions. They need a temperature of around 10 degrees Celsius (50 Fahrenheit) at night time and up to 24 degrees Celsius (75 degrees Fahrenheit) in the day. It is recommended that you don’t keep your orchid in your conservatory in long summer days as the extreme temperatures will be too much for your orchid. If you must keep your orchid in the conservatory then make sure there is enough shade.

It is important that your orchids get the right amount of sunlight. A lack of sunlight will result in the failure of your orchid to bloom. However, too much light, especially too much sunlight may result in your leaves burning. You can use the color of the leaves indicate whether your orchid is receiving too much light. A yellowish color on your leaves is a clear sign that your orchid is receiving too much light.

Think about the positions in and around your house where you keep your orchids. Because of their beauty, orchids are often kept on display in the main living area. How much natural light do these areas receive? Windowsills are a good place. Consider the directions that your windows are facing. North facing windows will be better for orchids which don’t require much sunlight. For orchids which require more sunlight then a south facing window will be better. Be careful of west facing window in the long summer evenings as sunburnt leaves are a real possibility.

If your geographical location means that you can’t provide enough natural light for your orchids then consider using artificial light. Allow your orchid some time to rest, don’t have the artificial lights on constantly.

Light is only one consideration when talking about orchid care but a very important one and shouldn’t be neglected.

– Nigel Howell

Nigel owns OrchidCareExpert.com a website which contains lots of useful information if you wish to know more about orchid care.

Leave a Reply

Learning About Orchid History

Learning About Orchid History

Author: Jules Sims

Most of us favor the orchid as a handsome, exotic and romantic flower. Most are also ignorant of their spectacular history and the passionate labors which have consumed into finding, cataloguing and creating the orchids which we enjoy today.

A record of orchids is detained at the Royal Horticultural Society in London. The Vanilla orchid was the first to pierce Europe back in 1510. This was the informer for the moment most luxurious flavouring remove (the most costly being the saffron crocus). Over a hundred days conceded, awaiting in 1635 when the Cypripedium reginae was imported from North America, this is when orchids were first appreciated for their decorative features. The advantage in the orchid blossomed from this moment onwards. However, even as deceased as the 1800 it was very unusual to excellent a collector with more than a few samples. In 1804 both the Berlin and the Paris Botanical Gardens both only held seven species of exotic orchid! The Viennese had the most with a complete eleven unique which in England there were simply three exotic orchids. These low figures were not for want of wearisome, countries were importing orchids all the time, however, they were failing in transit, or not being reserved in conditions which allowable for the plants to outlast their new climates.

Jean Linden was instrumental in increasing our wisdom of orchids, when in 1845 he travelled to South and Central America to learning the orchids’ normal environment. The hearsay which Linden wrote were crucial in the recreation of the soggy environments which we now colleague with most orchids.

Many of the early entrepreneurs who thought that this would be the way to make their millions were cut terse in their ventures as they experienced titanic losses as a product of the number of orchids not extant the first journeys. There were only four successful companies in Britain, one of them being Sanders, who endless to grow in the orchid bazaar for many living afterwards.

In the early nineteenth century Dr Salisbury studied the germination of the orchid and from this much was learned which enabled the industry to evolve and many of the orchids which were imported rapidly became a more viable investment. With this new education a gardener running for Veitch first tried to thwart different orchid species in 1853. It was not until 1856 that the first orchid hybrid was shaped. From this time on many more hybrids were to be fashioned. Mr Dominy who managed this probably had no idea how important this was and how it would change the impending of orchid cultivation. To this day the flawless black orchid is still being character after and is still false.

Today the exclusive and underdone qualities of the orchid are appreciated. In many areas there are species of orchid which are considered endangered and you can be prosecuted for pick or injurious these in any way. Some orchids are definitely for viewing only. The orchid family is the major flower family known and will continue to grow with hybrids being shaped each year.

Article Source: http://www.articlesbase.com/gardening-articles/learning-about-orchid-history-754748.html

Learn about singapore orchids and vanda orchids at the Care Of Orchids site.

Leave a Reply

Judging Orchid Shows

Many people attend orchid shows and see the ribbons and awards without any understanding of the judging process that took place

Orchid shows feature hundreds, if not, thousands of flowers arranged in artful displays.  In many shows, each of these plants are judged by teams of experienced judges and awarded ribbons or trophies.  The process by which this is accomplished is often mysterious to some people. This is an overview of how an orchid show is judged.

As there are many different kinds of orchids, so are there many different kinds of orchid shows.  I will address the show with which I am familiar and that is an American Orchid Society (AOS) accredited show as we see in the northeastern US and eastern Canada.  Specifically, I will refer to the annual show of the Southern Ontario Orchid Society (SOOS).

Plants are judged on several levels:  Ribbon, Trophy (including best-in-show) and AOS awards.

Ribbon judging looks at similar plants and determines which are the best.  They are awarded simple ribbons 1st, 2nd 3rd sometimes there is an honourable mention too.  To group similar plants together, a system of classes is used.  These classes are divisions based on genera, species/hybrid, and form/colour.  The Mid-America Orchid Congress maintains a basic list of around 110 classes.  Each individual show committee will determine if this class system works for their show. At SOOS, their class schedule is based on the Mid-America classes, but is augmented to allow for the plants that may appear in abundance at the show. ie Phragmepedium species (Mid-America class 42) are subdivided into three classes (SOOS classes 42a pink, red/yellow/orange; 42b green/brown; 42c long petal types).  At SOOS, classes are added for art and photography. 

The organization of ribbon judging is no small feat.  I have written a separate article that details this process.  With several hundred plants entered into over 100 classes, most shows rely on a computerized database to organize lists for the judges so they can find the plants.  Typically, the plants are registered on the set-up day (at SOOS we are able to pre-register plants on-line).  The plants are given numbered tags and the judges are given a list of the plants numbers in each class.  For a normal weekend show, Setup would be Friday and judging would be early Saturday morning before the show opens to the public.  On larger shows, this puts considerable pressure on the judges to get everything done in a few short hours. 

Ribbon judging is usually done by several teams of people.  The judging chair (an accredited AOS judge) will assign a group of classes to each team in an effort distribute the workload.  The judging teams are usually made up of on at least one AOS judge and a number of “lay-judges”, plus one or more Ribbon Clerks who record the judge’s decisions and actually place the ribbons on the plants. Together, this team takes their list of plants and proceeds to judge the plants in each class.  This means looking at each plant at least once and then discussing which plants are better.

Trophy judging adds to the pressure.  Trophies are usually awards for the best of a group of classes (like all Paphs). Best-in-show is also a trophy.  These frequently require collaboration between two or more judging teams as they will each have classes that are covered by that trophy.  Best-in-Show and other major trophies are coordinated by the Judging Chair.

After all that is done, then the AOS judges will go around the show and nominate plants for AOS judging.  The intricacies of the AOS award system is beyond the scope of this article, but basically, plants that are thought to be good enough to bear closure examination are pulled from the display and taken to a separate room.  Unfortunately it often happens that the show will open with the best plants absent for a short while until the judges award it (in which case it needs to be photographed before returning to the show) or pass it and it is returned.

With a group of experienced judges and a well organized show, this process appears effortless, but it requires the serious effort by a lot of people. But the results are worth it.  The growers are rewarded for their efforts and the public learns a little bit more about orchids


Max Wilson is the webmaster for Ravenvision Photographic; as well as the Southern Ontario Orchid Society.  He has been growing orchids for 15 years.

Leave a Reply

Everything You Need to Know About Orchid Fertilizer

Orchid fertilizer is essential for keeping your plant thriving. It delivers a blend of nutrients that the plant converts into energy for development  and growth. If you’re unfamiliar with the basics of using fertilizer, this article will tell you everything you need to know.

Macronutrients

Every good fertilizer contains three important macronutrients. They include nitrogen, phosphorous, and potassium. This is commonly abbreviated NPK. Nitrogen mainly helps the plant’s stem and leaves grow. While growth will likely be restricted if the plant doesn’t get enough nitrogen, too much can reduce flowering.

Phosphorous is essential for production of protein, which is necessary for the production of flowers. If the orchid doesn’t receive enough, growth may slow dramatically. It can also cause the plant to lose flowers early. The element potassium plays a role in loss and absorption of water. It also helps synthesize proteins.

Micronutrients

Orchid fertilizer should also contain micronutrients. They are needed to support flowers and new growth. Micronutrients are especially important if the plant is grown in a soil-less potting mix. Some of the most common micronutrients include copper, zinc, sodium, silicon, and cobalt.

Disease

There are inorganic and organic varieties of fertilizer. Organic varieties can harbor various diseases that may infect your plant. It’s usually best to use an inorganic mix. A special treatment process is used to destroy these diseases so that your plant will stay healthy.

Application

The main entry point of fertilizer is through the roots, so you should definitely spray them. However, the plant can also absorb some of the food that makes contact with its leaves. Most types of orchid fertilizer require that you dilute them with water. You should be careful not to get any water trapped between the leaves. This allows fungus or bacteria to buildup, especially when temperatures get cooler. This can easily be fatal to your plant.

Type

There are two different types of fertilizer, namely coated and water-soluble. The water-soluble type is liquid that has to be diluted with water and given to the plant. Coated fertilizer usually comes in the form of pellets. These pellets release the nutrients gradually over time. One problem you may have with these pellets is that they may be washed away during watering before the nutrients have been released.

-D. Swain

Giving your plant fertilizer is just one necessary part of caring for it. Come to care4orchids.com to learn how to take proper care of orchids . So, stop by today so that you can become an expert at growing orchids .

Leave a Reply